Tuesday 11 June 2013

Lee Friedlander - street photography


Lee Friedlander is an american photographer, born July 1934. He studied photography in Los Angeles, but moved to New York in this early twenties to photograph jazz musicians for record covers. He always took images in series, a few of these being


  • reflections/shadows - Friedlander would often put himself into his images, by using reflections or shadows. 
  • America by car - using car windows, mirrors or doors to create a frame within the image. 
  • American monuments


Here in this image you can feel the love and passion that Friedlander had for both photography and jazz music. Many times he would visit the musicians in their own homes and not just on stage. This was to show them as people 'behind the scenes' and not just the musicians they are when performing.


Monday 3 June 2013

Architecture


Architectural photography focuses on buildings and other constructions (bridges, stadiums, airports etc), interior design photography also comes under architectural photography.  The building in the image is the center of attention, any people in the image are there just to provide a sense of scale.  If using a DSLR camera a tilt shift lens can be useful as when you take a picture of a building you can see perspective on the building, the lens make it look straight (as seen in the image above). However you can do this without the tilt shift lens, by post production.

Here on examples that I found of a tilt shift lens.


As I don't have a tilt shift lens, I used photoshop to skew images. Here are some of the images that I took.


Aperture value
ISO -200
F 5


Before


Aperture value
ISO -200
F 5


After


Aperture value
ISO -200
F 5


Before


Aperture value
ISO -200
F 5


After


Before                                                                                           After

Aperture value
ISO -200
F 5


 To do this first I went to view, extras then grid. This is so that when I skew the image I can see when it's straight.


Then I went to select then all. After this I went to edit, transform then skew. At each corner on the photo a little square comes up, you move these to skew the image.


Problems on location


Just like at any photoshoot there are problems that can occur, here are some that can happen on location and how to try solve them.

Problems 

1. Bad weather 
2. Crying/shy children 
3. Faulty equipment
4. The general public in the shot/busy place
5. Uncooperative clients  

Solutions

1.  Plan ahead, check the weather forecast for the day of the shoot. Also as the weather can change over the course of the day, have a back up plan for a location that is near by.
2.  If a young child is involved it may be helpful to bring an extra family member so if the child is upset they can look after the child while the rest of the people can get on with the shoot. Sometimes its a good idea to have probs like toy or teddys to make the child feel more comfortable.
3. It can be good to have an extra camera and/or spare battery with you at any shoot as you never know if or when equipment will fail.
4.  Again this is about planning your shoot before, if you know its a public place, then different times of the day may be less busy, also if there are people walking past and in the background then you and your client may not end up with the final images that you/they wanted.
5. It is always a good idea to meet with your clients before hand, this is to make sure that both you and them are clear on ideas and how the shoot with play out. Most people will have a image in their head that they want, but of course it wont always turn out like that, again discuss this before hand and even draw up a contract for them to read and sign.

Sunday 2 June 2013

Urban- Graffiti


 In class we looked at different types of location photography, one of them being urban/street. I decided to look more into this and take some images of urban graffiti. I'm going to keep adding images to this collection when I go to different places. I shot these images all on aperture value and used photoshop to edit them.


ISO - 200
F 5
In this image i made the back 'black and white' and left the writing in colour. To do this I used the selection tool to select the writing, went to select and inverse to select just the back. I then took down the saturation to make it gray and select, inverse again to select the writing and added a bit of colour to make it stand out a bit more.
ISO - 200
F 5

ISO - 200
F 5


ISO - 200
F 5

Thursday 23 May 2013

SMART targets

Tasks that I need to complete by the 4th June 

Collections of 'urban graffiti' - edited and on blog - to be done by 27th May
                                              - shoot more images (24th May - 3rd June depending on weather)

Research - on blog - to be done by 25th May

Architecture - edited and on blog - to be done by 28th May

Evaluate and analyse images I've taken that are already on my blog - to be done by 4th June

Compare - images that I've taken with others - to be done by 23rd May


Thursday 9 May 2013

Using a 5 in 1 reflector


Gold


The gold reflector add a warm cast to the subject, sometimes when using this it can make the subject look orange.


Silver


The silver reflector is used in low light  to enhance natural light.


Natural light 


In this image the subject is placed so the sun is behind her this is why you see the


Diffused light


The diffuser is used to block the sun from the subjects eyes . This personally is my favorite.


Sunday 5 May 2013

Family shoot on location


We had a weekly task to do a family photo shoot on location, for mine I went to the park. The kids were very good to work with as they didn't really pose or look at the camera too much so it looks very natural. I shot on aperture value, on F 5 and ISO 400.

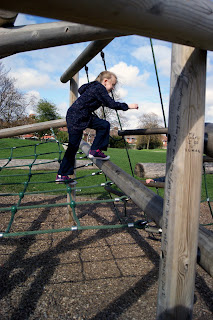
In this image I like how the wood create a slight frame around the top and right side of the image, this helps to draw your attention to the subject.

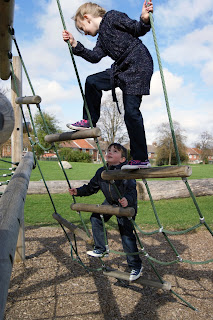
 In this image I like how the kids (brother and sister) are looking at each other I think it shows the bond between them. However it's very tight at the top of the image and her head is a little bit too close to the top.


This is one of my favourite image from the shoot, to me this image just says childhood. However I think it may have been better if I'd been slightly lower down so looking up to give a sense of power.
 I think this image has a bit of a comical feel to it, Oliver was holding on as much as he could so he didn't fall.


I edited this image in to black and white and I like how it turned out.


I also edited this one into black and white, however I think that in the colour image Oliver stands out more. Whereas in this image the back of his coat blends into the background because of the sun.


Here is the colour image, I tried to use 'back lighting'. This is a technique that is used in natural light, where the photographer faces the sun and the subject has his/her back facing the sun. In doing this you would create a 'glow' around the subjects head and/or body, it also stops the model from shutting there eyes (they would do so if facing the sun). As you can see in my image the sun is coming from the side of Oliver and he slightly looks like he's trying to shut his eyes. This will be something I'll have to keep in mind for my next shoot.


Here are some image that I found that I used for a bit of inspiration.


Here in this image, the boy is backlit and its narrow depth of field as the tress aren't in focus. This helps keep our eyes on the boy.